


Guide to DSLR Camera Settings- Basics of Photography Series Part 2
Digital Single Lens Reflex cameras.
With DSLRs featuring the most amount of settings out of all the camera types, it is important to understand what each setting is for, and how best it is utilised, even if you are able to set your camera to auto. Many photographers find that although setting their cameras to auto still produces beautiful images, often over time they will gradually move away from automatic adjustments, and begin to change their settings manually.
Below we have outlined some of the main basic settings which can be found on a DSLR, our understanding of them, and how you can use them to get more out of your shots whether on auto or manual.

Camera Focus (Auto//Manual)
What it is: Refers to setting the focal point of your image
What it determines: Focusing determines the spot on your image which will appear sharper than the rest. if you were taking a photo of your friend in a crowd then the focus point should be set to your friend, making the surrounding crowd appear less defined. Many cameras today have functions which allow both the camera to automatically focus and for it to manually allow the photographer to pick the focal point.
Autofocus is where the camera will pick for itself what area to ‘focus’ on in the image, although more and more cameras are coming with face recognition auto focus is still not perfect. A great compromise between going fully to manual focus is going to P mode which allows some settings to be adjusted automatically whilst others manually. When in P mode to focus your camera simply point your camera, partially press down the capture button, this will bring up a red box/ symbol framing the focal point. The placement of this focal point can be changed by switching to AF Area Mode (Single Area) this will allow you to pick either side points of the camera or the centre to focus on (scroll through them using left/right arrows).
ISO
What it is: ISO effectively refers to film speed (But without the film) and with it sensitivity to light.
What it determines: When we used to load film into cameras, typically we would load ISO 100 film. Nowadays with digital cameras and no film, ISO determines the digital equivalent of film speed. The higher the ISO sensitivity is set the more sensitive it is to light; however the higher the ISO the more grainy images (noise) tend to get and results in overexposure. ISO setting can be combined with shutter speed to create better photos.

Shutter speed
What it is: The number of seconds the camera shutter is open when taking a photograph. (can also be shown in fractions of a second).
What it determines: Shutter Speed helps to determine the amount of time the shutter is open and thus the amount of time light has to get to the image sensor. The longer the shutter is open (the lower the shutter speed) the lighter the picture will appear.
As well as the brightness of an image, shutter speed also can be used to capture motion in an exact moment, or the flow of motion, which will appear blurred. i.e. if you set the camera to a high shutter speed, faster, then it will capture a freeze frame e.g. of a car freeze framed, alternatively if the shutter speed is reduced, you will be able to capture the car in motion over the time it takes for the shutter to close, which creates the blurring movement effect.
Top Tip: A faster shutter speed can eliminate blurring which occurs from hands shaking whilst taking a picture.
Aperture
What it is: Aperture effectively determines the size of area light can enter the camera lens.
What it determines: Aperture affects both the brightness and the sharpness of a photo. A low aperture lets in a lot of light and also gives the effect of a blurred background (adds depth) around the focused image focal point. High Apertures on the otherhand are effective when you already have loads of light already (high apertures don’t let in much light) and captures everything in focus.
In the majority of cases, cameras can be set to auto whereby the shutter speed will automatically be set to ensure lighting is perfect i.e. a high aperture (letting in little light), can be countered by a longer shutter speed (lets in more light).
Exposure (Auto/Manual)
What it is: Exposure is made up of ISO Speed(controls sensitivity) , Aperture (controls amount of light let in), and Shutter Speed (duration of exposure) .
What it determines: Overall exposure determines the appearance of light in a photo. Using different combinations of these three can result in the same exposure, however you need to remember the other property of each setting; Aperture: depth, Shutter Speed: blurring, ISO Speed: Noise. Therefore you should have a play around with these settings to get the right balance. e.g. If taking a photo in low light, rather than lowering shutter speed to allow more light but a blurry image, instead look at increasing the ISO and using a faster shutter speed = brighter image. Alternatively using automatic exposure will adjust these three settings to what the camera feels is a suitable light and quality.
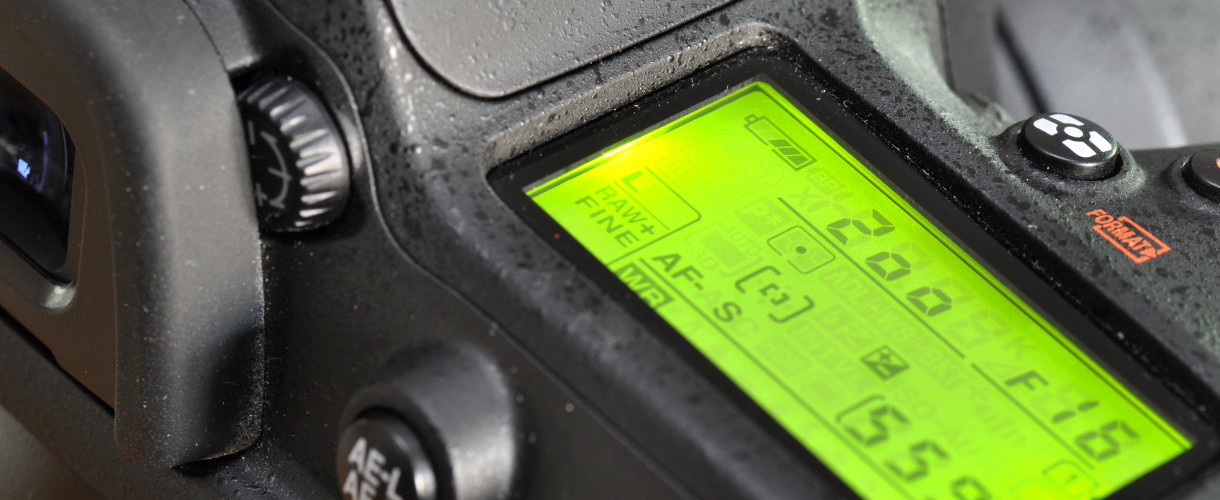
Settings Overview
To control setting cameras generally have a settings dial which allows quick changes to capture images. On this dial you can find symbols representing the mode the camera will go into in terms of how it will balance settings and how manual you want control to be.
These settings are good for if you are unsure what settings to use for a particular shot e.g portrait, the camera will then adjust settings to what it feels is generally the right combination of settings to capture the image.


Auto – camera automatically controls exposure (inc. ISO Speed, Shutterspeed) and flash.

P- Program, allows manual setting of some features e.g. flash and automated others to compensate for what it feels is the best shot

M- Manual full manual control of settings.

AV/A -Aperture Priority, photographer set the aperture whilst the camera compensates with other settings to produce the right exposure for an image.

TV/S – Shutter Priority- shutter speed is set by the photographer whilst the camera controls other settings to deliver the right exposure for the image.

Landscape- camera balances background and foreground.

Sports – High shutter speed to capture motion

Portrait – camera blurs background to bring attention to foreground (subject) using aperture.

Night – capture dark scenes using long exposure and flash.

Close Up-for taking close up photographs
Hopefully you now have a basic understanding of some of the harder parts of camera settings, there are others out there such as white balance, however the ones in this post are a good foundation to build your photography skills.
Keep an eye out on our blog and social for Part 3 in our Basics of Photography Series: Guide to Camera Lenses, or check out Part 1; How to Choose a Digital Camera.
Managed to take some great photographs? We run a monthly themed photography competition on Facebook which might be perfect for your captures. Visit our competition page.

